Last updated on April 4, 2026
Success in backgammon depends largely on how you apply strategy and skill to the luck of the dice. However, before mastering tactics, you must understand the game’s core mechanics. The “bar” is a key element that effectively dictates the pace of the play. Whether you are a beginner or an experienced player, you must understand the bar’s influence on your game. This guide explores everything you need to know about the backgammon bar, from re-entering, to strategic moves that grant you an advantage.
Understanding the backgammon bar
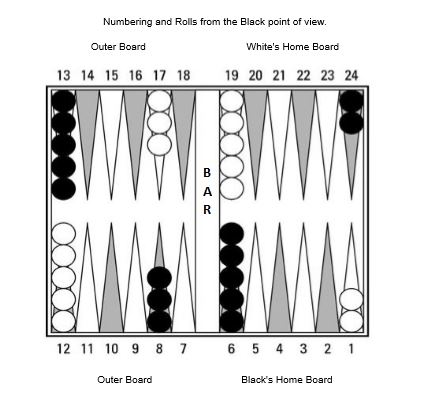
The bar is the central divider that separates the two halves of the board. When you hit an opponent’s checker (or piece), you send it to the bar and temporarily remove it from play. Think of the bar as a “jail”, you cannot use any checkers sitting on it until you re-enter them onto the board.
In backgammon, each player manages 15 checkers across four quadrants: your home board, your outer board, the opponent’s home board, and the opponent’s outer board. You move your checkers from the starting positions in the outer board towards your home board, finally bearing them off the board to finish. You win by bearing off all your pieces before your opponent does. Because pieces move in only one direction, you typically halt an opponent’s progress by defending positions or sending their pieces to the bar.
You can hit an opponent’s piece and send it to the bar if it sits alone as a blot. Pieces on the bar cost you a roll to re-enter, and you cannot move any other checkers until you have escaped every one of your checkers from the bar.
Rules for entering from the bar
When the opponent sends your piece to the bar, you must roll the dice to re-enter the board. You must roll a number that allows you to land on an open point in your opponent’s home board. This area contains six points (numbered 1 to 6).
Rolling to re-enter
If you have checkers on the bar when your turn begins, you must use your dice rolls to bring them back onto the board before moving any other pieces already in play.
Open points
To put a checker back into play, you must land on an open point, one that is either empty, occupied by a single opponent checker or occupied by your own checkers. For example, if you roll a 3 and a 4, you can move your checker to the 3-point or the 4-point in the opponent’s home board. You cannot move into a space that the opponent occupies with two or more checkers. However, you can land on a point if the opponent has only a single checker (a blot) there. If you cannot land on an open point, you forfeit your turn.
Multiple checkers on the bar
If you have several checkers on the bar, you must re-enter them one by one. Each move must correspond to an open point. If neither die allows for a valid re-entry, you lose your turn. This rule can prove frustrating, as you must skip your turn rather than spending the dice on other pieces.
Navigating backgammon’s jail
Navigating the bar requires both luck and strategy. While a checker sits in “jail,” it remains in limbo and halts your progress. This vulnerability forces you to focus entirely on re-entry rather than advancing or defending. In competitive play, you should avoid the bar at all costs. Multiple hits can cause major setbacks, causing you to lose turns and handing the advantage to your opponent. Conversely, you should aim to send your opponent’s checkers to the bar to seize control of the game’s pace. To reduce time spent in jail, prioritise secure points, limit blots and watch for moves that put you at risk. Building a strong formation in your own home board can deter your opponent from hitting your checkers in the first place.
Strategy to escape the bar
While escaping often feels like a matter of luck, these strategic steps can increase your efficiency:
- Identify Open Points: Constantly monitor the open points in your opponent’s home board. This helps you set realistic expectations for your re-entry.
- Avoid Risky Moves: Play conservatively. Avoid leaving blots that your opponent can hit. By minimising risk, you can focus on advancing your pieces safely.
- Build Your Home Board: A strong home board shifts the game in your favour. If you send an opponent’s piece to the bar when you have a strong home board, they will find it much harder to re-enter.
Effective bar strategy balances the urge for progress with defensive necessity. Sometimes, volunteering a shot temporarily serves a long-term strategy to gain board control.
Key rolls to escape the bar
You cannot control the dice, but you should recognise which rolls offer the best opportunities:
- Rolling Doubles: Doubles grant you four moves instead of two. If the corresponding point is open, you can move a checker from the bar and still have three moves left for other pieces.
- High and Low Numbers: A mixed roll (like a 2 and a 6) increases your chances of finding an open point. High rolls reach points further into the home board, while low rolls land on points closer to the bar.
Related content
Backgammon Glossary: the bar at Backgammon Galore.