Last updated on January 31, 2026
A lone checker, or a blot, is in direct range of a hit if it lies six or fewer points away from an opposing checker. This means that it can be hit with the roll from a single die. An indirect hit requires the sum total of two dice (7+) to successfully hit. A basic understanding of probability will demonstrate that a checker in direct range is far more vulnerable than a checker at an indirect range.
In this Deluxe Backgammon post for beginners, we will take a look at why you should avoid leaving direct hits. It is a dilemma that will often be faced by new players. If you are new to backgammon, this is an important concept to understand if you wish to become a better player. Sometimes, leaving a direct hit is unavoidable, but it is still worth understanding why it is a high-risk tactic.
Blots
A single checker on a point is known as a blot. The blot is vulnerable to being hit if an opposing checker lands on it. This will send the checker back to the bar, where it will be forced to try and re-enter. The difficulty of re-entering will depend on the strength of the opponent’s home board. There are several negatives associated with being hit.
First, backgammon is a racing game. When a checker is hit, it effectively returns to the start and needs to move all the way around the board again. This can cause you to fall behind in the race. Additionally, when a checker is hit you are forced to use at least half of your next roll to enter from the bar. This effectively makes it more difficult to develop your position or attack your opponent on the same move. Lastly, if you fail to re-enter, you forfeit your turn and let your opponent get further ahead in the race. This is particularly the case if your opponent has a closed home board because of a six-prime.
Strategy
Absolute beginners typically adopt one of two styles of play, defensive or running. The defensive style involves being overly careful and avoiding leaving blots at all costs. This is due to the fear of being hit, but leads to a weak board structure due to a series of over-stacked points. This style of play is typified by a series of ‘candlesticks’ around the board and a lack of flexibility. At the opposite end of the scale is the running game. Here, the typical beginner races their checkers around the board with little concern about where they are leaving their blots. This is especially dangerous on your own side of the board, as they’ll have to go a long way back when hit. It is this running style of play that typically leaves a lot of blots to be hit (Leaving blots at The Gammon Press).
Adapting play
Experienced players know that there is more to backgammon than these simple strategies. There is a time and a place for these strategies. However, good players need to adapt their tactics and change their strategies according to the state of the game. Within these varying strategies and tactics, there is a definite need to leave blots to create a flexible board (Flexibility at USBGF).
Slotting, splitting and placing builders are all tactics that leave blots. The secret is to know where to avoid leaving blots. When we talk about hitting, there are two main types, direct hits and indirect hits. A direct shot can be hit with one die, that is a roll of 1 to 6. An indirect hit is one that requires a combination of two dice (7+) to hit. A direct hit is much more likely to succeed than an indirect hit, where a combination of both dice is needed to make the hit. Slotting is a useful tactic to help build primes.
Dice outcomes
The table below shows all of the possible outcomes for the roll of two dice. If we look at an example, where a blot is left within six pips of an opponent’s checker. This is within range of a direct hit. The table shows that there are 11 rolls that include a six on at least one die. This equates to 31% of all rolls. Therefore, there is nearly a 1 in 3 chance of the blot being hit.
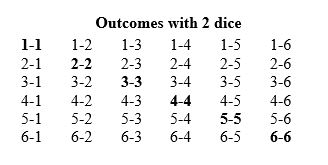
Now if we consider a blot being left 7 pips away from an opposing checker, we need to combine two dice to reach the required total. If we examine the rolls, we can see that there are only 6 rolls that total 7. This equates to 17% of all rolls. If we move the blot further away to 11 pips, we see that there are only 2 possible rolls that can hit the blot. This equates to 6% of all rolls. In general, the further away from the blot, the less likely it is to be hit. Based on these numbers, if you need to leave blots, try to leave them at least 7 pips away from an opposing checker. This significantly lowers the chance of being hit.
Probability
The probability diagram below shows the chances of being hit via both direct and indirect shots. This increases the likelihood of being hit inside 6 pips when both dice are combined. This clearly shows that the most dangerous place to leave a blot is 6 pips away from an opposing checker. If you have no secure points in between the opposing checker and the blot, it will be hit 47% of the time. In contrast, a blot 1 point away from an opposing checker will only be hit 31% of the time (How to Calculate Backgammon Probabilities at ThoughtCo.).
The general rule here is if you have to leave a blot in range of a direct hit, the closer to the opposing checker the better. The table assumes that the board is open for every possible throw. If part of the throw is blocked by an intervening point being held by opposing checkers, the chance of being hit is less.

Hitting
These numbers can also be applied to those occasions when you want to be hit in backgammon. This may sound counterintuitive to novices, as from the very beginning, most players are taught that being hit should be avoided at all costs. However, there are certainly times when you will want to be hit to re-establish yourself in the game. Perhaps you want to slow down the play or recycle some checkers to position yourself to hit your opponent. On these occasions, you definitely want to be leaving your blots within range of a direct hit (Backgammon: Making a Hit at How StuffWorks).
In summary, the general rule in backgammon is to avoid direct hits where possible. This is because when you get hit, you not only lose ground in the race, but also half your next roll just to re-enter. There is also the possibility of being unable to re-enter and forfeiting the turn if your opponent’s board is closed.
Related content
Backgammon, basic defensive play.
Backgammon, considerations when hitting.
An interesting video on MonkeySee discusses the difference between direct and indirect shots.

If I roll a 2 and a 3, can I hit my opponents open blot with my 3 roll and continue moving my same piece another 2 spots or do I have to leave my man on the space that I hit my opponents blot and move a different man 2 space to complete my turn?
Hi Katie, you certainly can move the same checker both the 3 and the 2, as long as the point it is moving to is open (not occupied by two or more opposing checkers). Thanks for taking the time to comment, Jason.
In a scenario where I roll a one and a 3 and my opponent has a single checker at one do I have to blot or can I move 3 first then one?
Hi Ana, you don’t have to hit. Assuming there are no other oppsoing checkers involved you can move 3 and then the 1, avoiding the hit. However, you must always move both numbers rolled if it is possible. If you can only play one of the rolls, but not both you, must play the highest roll. In the scenario you mention, tf the 3 was blocked, you would be forced to play the 1 first and then play the 3 assuming there were no other blocks. We have a simple version of the backgammon rules and a more detailed version of the backgammon rules. I hope this helps, and let us know if you have any further backgammon questions. Thanks for taking the time to comment, Jason.