Last updated on April 29, 2024
This Deluxe Backgammon post is another in our series for beginners and newcomers. A blot is a checker that sits alone on a point, which leaves it vulnerable to being hit and sent back to the bar. Then the checker needs to be re-entered and brought all the way around the board from the start. It is a considerable disadvantage to be hit as this will push a player further back in the race.
As a beginner, one of the first things you learn about backgammon is the importance of not leaving blots. After learning this, some beginners adopt a backgammon strategy of not leaving any blots at all. However, if this strategy is applied, it creates a game that tends to become very static and stale. This can leave a player in a position where they have many checkers stacked across a small number of points. This creates a situation whereby there are very few good moves available. In this backgammon post, we will discuss where and when to leave blots.
The element of risk
The primary reason that beginners do this is the fear of being hit. However, in order to achieve a smooth and flexible progression of the checkers around the board, players need to learn to play with an element of risk. This means leaving checkers unprotected from time to time. A calculated risk allows players to improve the development and structure of their board. In this post, we will take a look at some considerations for how to leave a blot to maximise the benefit with minimal risk. A flexible style of play creates more opportunities for good dice rolls because there are more starting points available. It is all part of the psychology of the game.
Imagine an opening roll of three-two. Normally, beginners would want to play safe and would look for the safest position. The typical response for a novice would be to move a checker from the mid-point down to the 8-point (13-8). It is not the worst move possible, but it does limit the flexibility of the next roll as you only have four points from which to make a move.
In contrast, a more flexible position is gained by moving 24/21, 13/11. This develops both sides of the board. The blot in on the 21-point is vulnerable, but few points are lost if it is subsequently hit. Your opponent is only likely to hit it if they could also secure the point. The blot on the 11-point is relatively safe as it can only be hit with a total roll of 10 (6-4 or 4-6). You now have checkers spread across six points which gives extra starting points from which to make a move and therefore more options.
In your opponent’s home board
The closer a checker is to your home board, the more a player stands to lose when it gets hit. The hit checker was close to home and now it has to be placed on the bar, re-entered and start from the far side of the board again. This gives a considerable disadvantage to the player who was hit. However, if a lone checker is hit in the opponent’s home board, the loss is much smaller. The checker will only retreat a handful of points. Assuming the checker can be re-entered quickly, the damage is minimal. As a rule of thumb, if you are in a position where you have to leave a blot, it is generally best to leave it where the loss will be smaller.
This concept is also worth considering early in the game when you have the opportunity to split the back checkers, especially when you can land on your opponent’s five-point. If you can secure the five-point a subsequent roll, it confers a huge advantage as it creates an advanced anchor in the opponent’s home board. If the checker is hit, the damage is small as no great distance is lost. Additionally, re-entering may provide an opportunity to hit back, which would be extremely damaging to the opponent.
Direct vs indirect hits
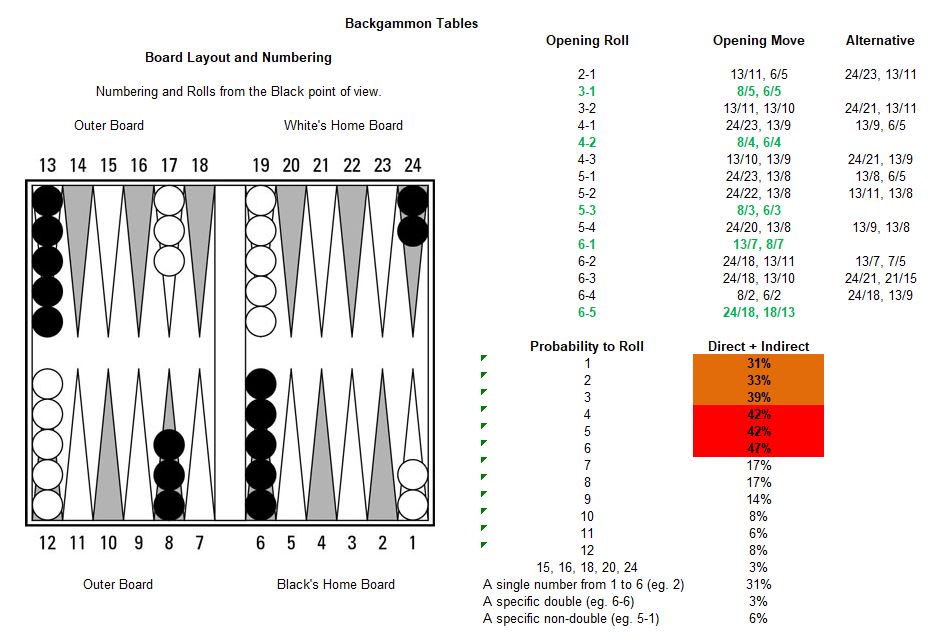
An understanding of probability helps when deciding when and where to leave a blot. The chances of your blot being hit vary depending on how far it is from the opponent’s checkers. A direct hit is one where the blot can be reached on the roll of a single dice (1 to 6). An indirect is one that requires the sum of two dice to hit (7 to 12). This means that at distances between 1 to 6 you are more likely to be hit than at distances greater than 6. On the other hand, at distances below 6, close is better than far off.
The table below shows the percentage chance of being hit depending on the distance. If you have to leave a direct hit, it is clearly better to be 1 space away than 6. In summary, when leaving a blot, try to put it as far away from your opponent’s checkers as possible. Ideally, this should be 7 points or more. Otherwise, leave it as close as possible. The table assumes that the board is open for every possible throw. If part of the throw is blocked by an intervening point being held by opposing checkers, the chance of being hit is less.
The structure of your opponent’s home board
Another aspect to consider before leaving a blot is the structure of the opponent’s home board. If your opponent has blots in their home board, they will be hesitant to hit your blots. This is because of the risk of being hit upon re-entry of your checker from the bar. In this situation, it is worth considering leaving blots if it creates a builder to improve your position on a subsequent roll.
Alternatively, if your opponent’s home board is strong, with a number of secure points it can be dangerous to risk leaving a blot. This is because re-entry may be difficult. This is particularly the case if your opponent has a six-prime in the home board. In this situation, it is impossible to re-enter until they have started bearing off their checkers.
Related content
USBGF rules and terms of backgammon.


This is really useful. I have been playing backgammon socially for many years, but haven’t really taken it too seriously until now. I have been reading about backgammon strategy and tactics – Deluxe Backgammon has been really helpful! I had never really thought about where to leave blots before, but this makes a lot of sense after you consider the probability of being hit. It will no doubt improve my backgammon!
Very helpful. I han’t really thought about the “direct hit” concepy before, but it seems to wrok. My backgammon seems to have improved, but I won’t be sharing the tip with my opponents!