Last updated on February 9, 2026
In this Deluxe Backgammon post for beginners, we will take a look at the importance of builders and how they can help develop your board. A builder is a checker in a position to help secure key points which need to be made in subsequent rolls. Builders can be anywhere on the board, but typically they are checkers that have been slotted into your outer board. They will then be used to secure points in your home board in upcoming rolls (Builder at Learn.Play.Win).
Stacked points
At the start of play, most of the builders are stacked on the mid-point, the 6-point and the 8-point. However, the back checkers, if split early, could also be considered builders if they are used to try to secure an advanced anchor. Only two checkers are required to secure a point. Any excess checkers can be considered material that could be better used elsewhere.
Beginners are often guilty of stacking and creating “candlesticks”. This is because they are too afraid of leaving blots anywhere on the board. Stacking many checkers on a single point is a bad tactic because it reduces the number of rolls you have to secure any given point. You need builders, and you need them spread out across the board to increase the chances of securing key points. A stretched position is one lacking builders, which is then exposed to difficult numbers with which to further develop the board.
If you have several active builders within range of a specific point, the odds of securing that point on a subsequent roll increase. This is particularly the case if there are several builders within direct range (6 pips) of the point you are trying to secure. If you are leaving a blot as a builder, you evaluate the risk of being hit. It certainly isn’t wise to leave a blot within range of a direct hit (6 or less). However, sometimes it is necessary to leave a shot so that you have more builders and a flexible position.
Slotting
An example of taking the risk with builders is shown on the 2-1 opening roll shown below. The 1 is used to unstack the 6-point, slotting a blot on the 5-point. The 2 is used to move a builder down from the mid-point. This is an aggressive opening move, with the goal of securing the 5-point on the next roll. The obvious danger is the risk of the blot on the 5-point being hit. However, if the opponent misses and the 5-point is secured on the next roll, the risk will have paid off handsomely. Slotting is a useful tactic to help build primes.
A stacked point is one that has three or more checkers. In contrast, a stripped point is one that has only two checkers. In both cases, the points are secure. However, the stacked checker has the option of attacking with one of the spare checkers, whilst still leaving the point secure. A stripped point can lead to a lack of flexibility on subsequent rolls (Slotting at Backgammon Galore).
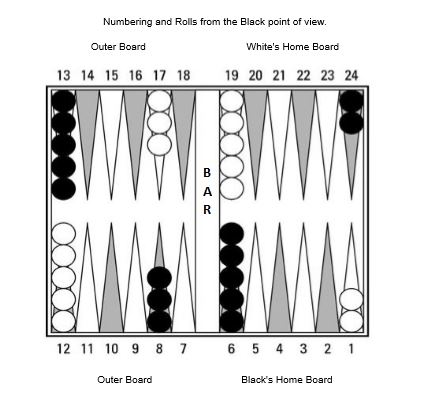
In general, it is wise to unstack any point with more than three checkers. These can be used as builders elsewhere on the board. Also, adding a checker to a stacked point should be avoided. An exception to this is the opening roll of 6-5, known as the Lover’s Leap. Statistically, it is the best move with a 6-5 opening roll. The move advances a back checker to the safe mid-point, which you will be able to use as a builder on subsequent terms. The Lover’s Leap provides the option of adopting a running strategy early in the game.
Mid-point
Some players consider that this move is over-stacking the mid-point. However, the lover’s leap has been proven by computer rollouts to be the best possible move for the 6-5 roll. If you are going to stack checkers on a single point, the best place to do it is the mid-point. The mid-point is a safe spot where you can congregate your builders and begin to develop your side of the board.
If your opponent leaves a stripped point, it is often tactically sound to attempt to freeze the builders on that point. An example would be when your opponent opens with a 6-1 and secures their bar-point. The 8-point is now stripped with no spare checkers to attack with. At this point, it is tactically correct to split the back checkers. If your opponent now hits with one of the 8-point checkers, they lose a secure point and risk being hit in return. This would mean they lose a lot of ground and a secure point. They would probably take the risk if one of your blots was on the 5 or 4-point. However, they are unlikely to take the chance of hitting deeper in the board.
Outer board builders
The mid-point provides you with spare checkers to be used as builders in your outer board. It also provides a safe landing place for the back checkers when they escape from the opponent’s home board. An appreciation of probability helps when planning when and where to leave a blot in your outer board. The chances of your blot being hit vary according to how far it is from the opponent’s checkers. A direct hit is one where the blot can be reached with the roll of a single die (1 to 6). An indirect is one that requires the sum of two dice to hit (7 to 12). This means that at distances between 1 and 6, you are more likely to be hit than at distances greater than 6. On the other hand, at distances below 6, close is better than far off (Leaving blots at The Gammon Press).
Risk evaluation
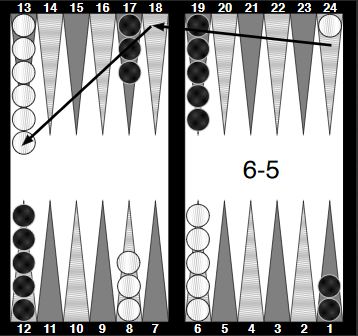
If your opponent has an advanced anchor, it will limit your choices, as several points may be in the range of a direct hit. However, if your opponent’s back checkers have not been split and remain on the 1-point, only a blot on the bar-point is in range of a direct hit. Several recommended opening moves require bringing down two builders from 13 and leaving two blots on your outer board. The intention of the moves is to secure one of the bar, 5 or 4-points on the next turn. These moves might include the opening rolls of 5-2, 4-3 and 3-2.
If we look at the 4-3 as an example. The move would be 13/9, 13/10, bringing two builders down from the mid-point. This provides options to secure the 9, bar, 5 or 4-points on the next turn. The blots are vulnerable, but at a distance that black can only hit one with an above-average roll. The risk is worth taking with the opponent’s home board wide open. Remember, backgammon is about constant risk and reward evaluations. The best time to take a risk is early in the game when there is time to recover (How to Calculate Backgammon Probabilities at ThoughtCo.).
Related content
Backgammon, aggressive and defensive play
An interesting article from The Gammon Press explaining builders.

In backgammon builders are really important. They give you the flexibility to make points later in the game. Just remember to try not to leave in range of a direct hit. Informative post, well done.