This is a complete guide to the rules of backgammon. Everything is explained from how to setup the board, the movement of the checkers and the process of bearing off. The Deluxe Backgammon Playing Guides and Glossary will help explain some of the terms below.
Setup
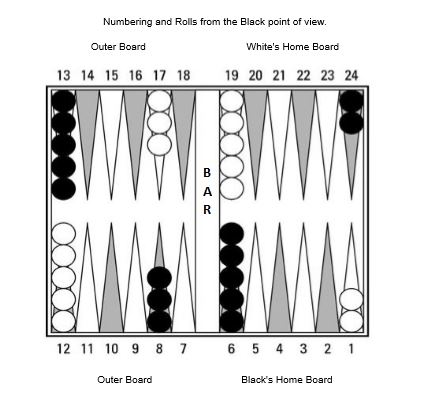
Each side of the board has a line of 12 long triangles, called points. The points form a continuous track in a U-shape and are numbered from 1 to 24. In the standard setup, each player begins with fifteen checkers, two are placed on their 24-point, three on their 8-point, and five each on their 13-point and their 6-point. The two players move their checkers in opposite directions, from the 24-point towards their 1-point.
Points 1 to 6 are known as the home board or inner board, and points 7 to 12 are known as the outer board. The 7-point is also called the bar point, and the 13-point is also called the midpoint (Mid-point at Backgammon Galore).
Movement
At the start of the game, each player rolls one die. The player with the higher number moves first using the numbers shown on both dice. If the players both roll the same number, they must roll again. Both dice must land completely flat on the right-hand side (for each player) of the gameboard. Subsequently, the players take alternate turns, each rolling two dice at the beginning of the turn. Dice cups are normally used to ensure the rolls are genuinely random.
After the dice have been legally rolled, the players must, wherever possible, move their checkers according to the number shown on each die. For example, if the player rolls a 6 and a 3 (denoted as 6-3), the player must move one checker six points, and another or the same checker another three points. The same checker may be moved twice, as long as the two moves can be made separately and legally.
Doubles
If a player rolls two of the same number, this is called doubles. In this instance, the player must play each die twice, resulting in four moves. For example, a roll of 3-3 allows the player to make four moves of three spaces each.
Compulsory moves
On any roll, a player must move according to the numbers on both dice if it is possible to do so. If one or both numbers do not allow a legal move, the player forfeits that die roll, and the turn ends. In the instance where moves can be made according to either one die or the other, but not both, the higher number must be used. If one die is unable to be moved, but such a move is made possible by the moving of the other die, that move is compulsory. This is one of the most misunderstood rules in backgammon.
Hitting
During a move, a checker may land on any point that is unoccupied or is occupied by one or more of the player’s own checkers. It can also land on a point occupied by exactly one opposing checker, or “blot“. In this case, the blot has been “hit” and is placed in the middle of the board on the bar that separates the two sides of the playing surface. A checker may never land on a point occupied by two or more opposing checkers. Therefore, no point is ever occupied by checkers from both players simultaneously. There is no limit to the number of checkers that can occupy a point at any given time (Backgammon: Making a Hit at How StuffWorks).
Entering from the bar
When a checker is placed on the bar, it must re-enter the game through the opponent’s home board before any other moves can be made. To re-enter, the player rolls both dice. The numbers rolled indicate which points in the opponent’s home board the checker can land on. A checker can re-enter on unoccupied points, points occupied by the player’s own checkers, or points with only one opposing checker (which would be hit and sent to the bar). However, a checker cannot land on a point that is occupied by two or more of the opponent’s checkers.
A player must re-enter all their checkers from the bar before making any other moves. If none of the points indicated by the dice are open, the player loses their turn. If the opponent’s home board is fully blocked (all six points contain two or more checkers), re-entry is impossible. In this case, the player must wait until an opening occurs. Once all checkers are re-entered, any remaining dice rolls can be used to move other checkers on the board.
Bearing off
When all of a player’s checkers are in that player’s home board, that player may start bearing off. A roll of 1 may be used to bear off a checker from the 1-point, a 2 from the 2-point, etc. If all of a player’s checkers are on points lower than the number showing on a specific die, then that player may use the roll to bear off one checker from the highest occupied point.
For example, if a player rolls a 5 and a 4, but has no checkers on the 6-point or the 5-point, but two checkers on the 4-point. The rolls must then be used to bear off the two checkers from the 4-point. If there is a way to use all moves showing on the dice, by moving checkers within the home board or bearing them off, the player must do so. If a player’s checker is hit while in the process of bearing off, that player may not bear off any others until it has been re-entered into the game and moved back into the home board (Backgammon: Bearing Off at HowStuffWorks).
Winning
The first player to bear off all fifteen of their own checkers wins the game. A gammon occurs if the opponent has not yet borne off any checkers when the game ends. This doubles the stakes. A backgammon occurs if the opponent has not yet borne off any checkers and has some on the bar or in the winner’s home board. This triples the stakes. Victory in a normal game results in a win by one point. A gammon is two points, and a backgammon is three points. These points are then multiplied by the value of the doubling cube.
Doubling
To speed up match play and to provide an added dimension for strategy, a doubling cube is usually used. The doubling cube is never rolled because it controls the stake in the game. It is used as a marker with the numbers 2, 4, 8, 16, 32, and 64 inscribed on its faces. The number denotes the current stake in the game. At the start of each game, the doubling cube is placed on the bar with the number 64 showing. At this point, the stake is effectively one.
During play, the player about to roll may propose that the game be played for twice the current stakes. This occurs by turning the doubling cube so that the number 2 is showing. Their opponent must either accept the doubled stakes or resign the game immediately. Note: There is nothing in the rules of backgammon that says the doubling cube must be used.
Related content
Simple backgammon rules, including a single page PDF
Tournament rules at the World Backgammon Federation.
I have been playing backgammon all of my life. Recently, I have introduced some friends to backgammon and pointed them to this post so they could understand the rules. You cover everything and it is really easy to follow. Thanks, you have helped me introduce a few more people to the world of backgammon.
Clear and concise. A very comprehensive description of the rules of backgammon. I am new to backgammon, any tips on how to improve my game?
Hi Roland, yes start with the backgammon playing guides and read through the basic posts. Next, read the post on how to improve your backgammon. Finally, return to the backgammon playing guides and read the posts for beginners and intermediates. Practice backgammon, apply what you have learnt and your backgammon will improve. Thanks for for commenting at Deluxe Backgammon, Jason
I am playing a game on-line. I have all of my cubes in my home place and rolled a number where I cannot play either dice. The message comes on that if I play one dice, I cannot play the other (i.e. say I rolled a seven and all I have left is two in the #three spot and 6 in the number two spot. The black has two in the Number 1 spot in my home. No Play! The game does not allow any more plays. How do you get out of this other than closing the game down and starting a new game. Thanks for any advice for further use. Helen
PS – I am playing against the computer!
Hi Helen, the backgammon rules are quite clear: “On any roll, a player must move according to the numbers on both dice if it is at all possible to do so. If one or both numbers do not allow a legal move, the player forfeits that portion of the roll and the turn ends. If moves can be made according to either one die or the other, but not both, the higher number must be used. If one die is unable to be moved, but such a move is made possible by the moving of the other die, that move is compulsory.” In the scenario you give you should forfeit your turn and black should take their turn. Perhaps, you should try another platform, both Backgammon Free by AI Factory and XG Mobile Backgammon allow you to play agaiinst computer opponents. At the time of writing both of these Android backgammon applications were free. I hope this helps, Jason
Entering from the bar
Checkers landing on the bar must re-enter the game through the opponent’s home board before any other move can be made. They may not enter on a point occupied by two or more of the opponent’s checkers. Checkers can only enter on unoccupied points or points occupied by a single opposing checker. In the latter example, the single checker is hit and placed on the bar. Multiple checkers can be on the bar at any one time. A player may not move any other checkers until all checkers on the bar belonging to that player have re-entered the board.
A scenario seems to have been omitted here. Can a checker enter on a point on the home board occupied by one or more of the same player’s checkers?
Thanks, Tom
Hi Tom,
You are correct, “Can a checker enter on a point on the home board occupied by one or more of the same player’s checkers?”. I assumed that everyone would know that it only meant your opponent’s checkers. I agree this could be a little clearer, so I have amended the text above to say “A checker can re-enter on unoccupied points, points occupied by the player’s own checkers, or points with only one opposing checker (which would be hit and sent to the bar)”. I hope this is much easier to understand. Thanks very much for helping improve our content, Deluxe Backgammon
Seeking clarity on a situation that is still not in the stated rules. Opponent had 2 checkers left to bear off, 1 on the 2-point, 1 on the 4-point. Opponent then rolled a 3 and 5.
The question is, can the opponent bear off both checkers or are they required to use the 3 to move the checker on the 4-point to the 1-point, and then bear off the other checker (thus not ending the game on this turn)?
It is not clear because the rules state “If there is a way to use all moves SHOWING ON THE DICE, by moving checkers within the home board or bearing them off, the player must do so.” Since a 3 was showing, is it true that moving the checker for 4-point to 1-point is the only way to use the moving showing on the dice
Hi Tim, that is a good question, that we have been asked before. As you mention, backgammon rules clearly state that a player must utilise all numbers rolled on the dice if a legal way to do so exists. During the bearing-off phase, if a checker is not on the exact point corresponding to the roll, it can be borne off from a higher point, or from the highest occupied point if no higher points are available. In the specific scenario described—an opponent with checkers on the 2-point and 4-point, rolling a 3 and a 5, the player can legally bear off both checkers. The 5 can be used to bear off the checker from the 4-point, as it is a higher roll than the point, and the 4-point is the highest occupied point. We hope this answers your question. Thanks for taking the time to comment, DB